Task profile
All task details are viewed using this lightbox, which eliminates the fatigue of switching between lists and previous and previous pages.
The functions here are all instantly changed and no additional storage is required. Except for the text editing area
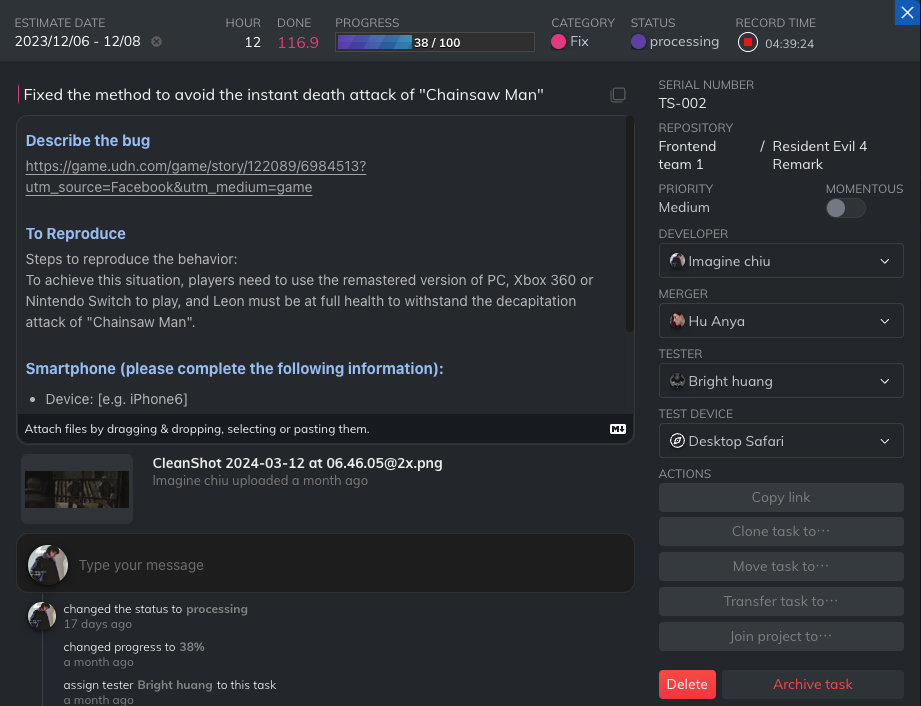
1. Progress area
All content related to the project progress is here

1.1 Estimate date
Set the expected development interval of the task so that we can arrange the work without conflict, and there will be a label to remind you when it is about to expire or is overdue.
1.2. Estimate Hours
Expected working time (hours), so that there is no conflict in work arrangements. Through the ❼ recording function, we can compare the accuracy of the assessment. If you use it in the project, it can be converted into the amount of the quotation at the same time.
1.3. Done
Through the ❼ recording function, we can understand the actual working time
1.4. Progress
The most important thing about the progress function is that when managers or themselves have a lot of tasks, they can look at the table to know where the current completion progress is.
1.5. Category
Task type, respectively Feat, Fix, Refactor, the changes here will be displayed on the left side of the title bar
1.6. Status
The status of the task is divided into Ready start, Processing, Pause, Wait merge branch, Wait updated, Wait tested, Need fix, done, cancel. The initial task will be preset in Ready Start.
1.7. Time record timer
Use the timer to help you record working time, and when the work is completed, compare the difference with the evaluation time to make the next evaluation more accurate.
2. Content area
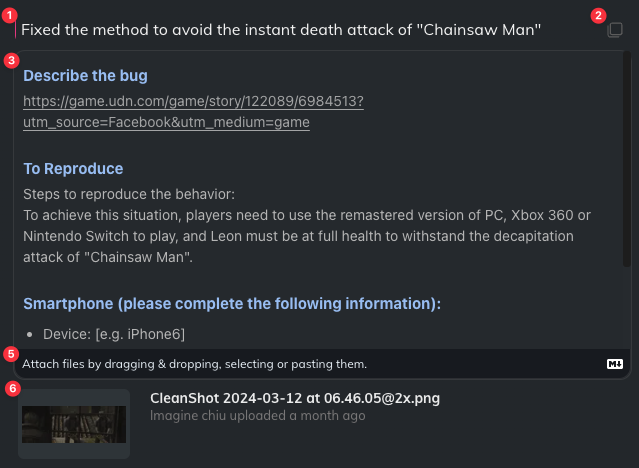
2.1. Title
The title of the task, which is also the name of the task as seen in the task list.
The line on the left is the color of the task category: correction (red), optimization (yellow)
2.2. Copy git commit command
Quickly copy the Git Commit command. After we have worked hard to develop the task, we no longer need to think about what our Commit message requires. We only need to be careful when setting the task title.

Then move it to the terminal and paste it
2.3. Content
The task content is edited in Markdown format. You need to manually press Save to update to the database.
If you don’t want to switch to the mouse, you can directly use the shortcut key Ctrl+S for quick saving.
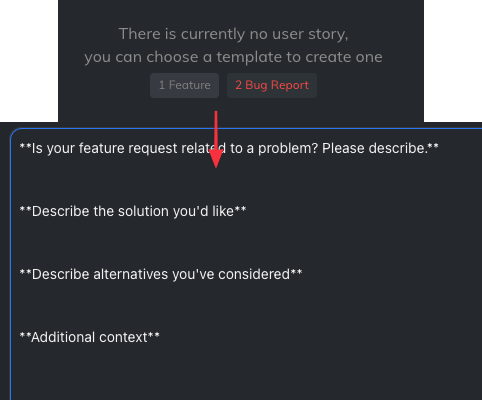
If you don’t know what to type, you can click on the template on the screen to quickly create it, such as the picture below
2.4. Upload file
You can upload pictures or files, such as development requirements design draft or BUG screen for reference or related files
- The pictures are for schematic purposes, so destructive compression is used
- The file must be within
5MB. If you need more space, you can contact us to use the enterprise plan - You can use
Ctrl+Vto upload pictures in your clipboard, or you can drag and drop pictures to upload.
3. History area
History records about this task order
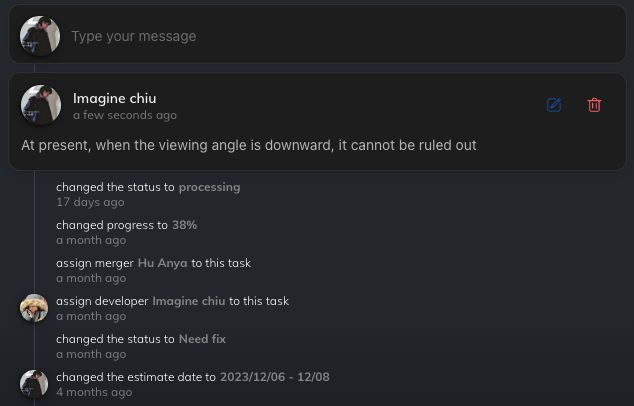
3.1. Add Comment
When we finish development today and there are still questions, you can leave a message so that you can quickly recall the situation the next day and let your supervisor know the status of the task.
Markdown format is also supported here, you can write code
3.2. Change log
When you change the task order, the task record will appear here
There are currently no recorded changes to task content
4. Info area
All information about this task order is displayed here.
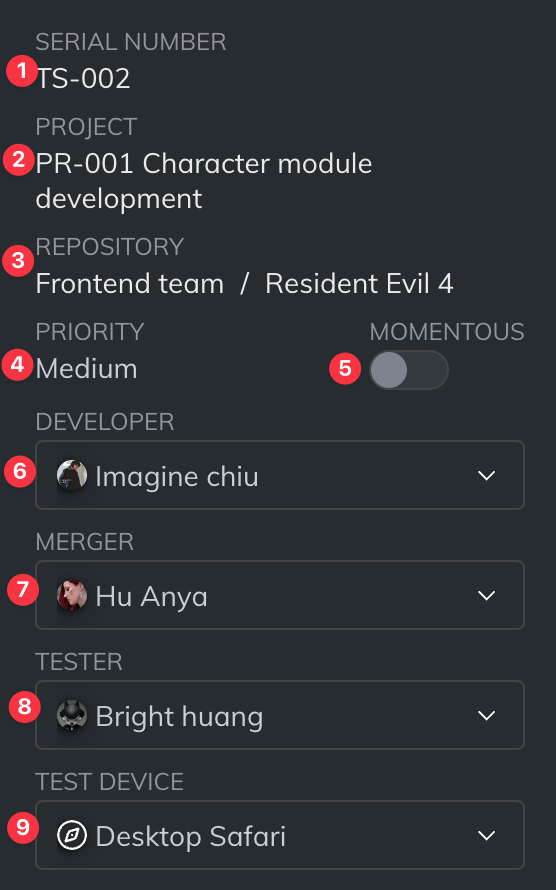
4.1. Serial number
Each task will generate a unique serial number of the workspace
4.2. Project
For the project of this task list, this field needs to be added to the task of the project to appear.
4.3. Repository under the team you belong to
The storage pants under the team this task list belongs to
4.4. Priority
When we arrange tasks, we can arrange them first according to the priority of the task
4.5. Mark a note to do (Momentous)
Set whether it is an important task order, and you can easily check it from the tab in the future.
4.6. Assign Developer
Assign a developer, or the person who mainly performs tasks
4.7. Assign Merger
Assign merger (ex: git pull request assigner), or reviewer
4.8. Assign Tester
After the task development is completed, a tester is needed for manual verification.
4.9. Set Test device
When a tester discovers a bug, the test device is marked, allowing developers to more quickly understand on which device the task occurs and find the problem more quickly.
5. Actions area
Blocks that are operational for the task
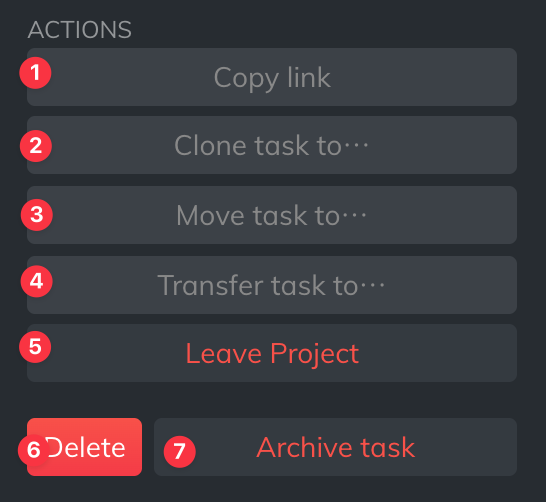
5.1. Copy the link
For example, the function of sharing copy links, examples of copying content are as follows:
Fixed the method to avoid the instant death attack of "Chainsaw Man"
[Cabcom] Frontend team 1 / Resident Evil 4 Remark
https://acrool.com/ws/01hhhrs6sgyxxxxkkxhevrev69/task#/task/01hhxxxx33ncqb7v649hr1dv7w
5.2. Clone task to
If your product divides the mobile version and the computer version into different Repositories, you can directly use this function to clone without adding the same task order twice.
5.3. Move task to
Move tasks to other repositories under the same team
5.4. Transfer task to
Move tasks to other repositories under the same team
5.5. Join project to
Add or transfer the task to other projects. If the project has been added, the Remove Project will be displayed.
5.6. Delete
Delete task order
When deleting, a confirmation window will appear. Once deleted, it cannot be restored, so please use it with caution.
5.7. Archive task
Save the task
The system will automatically archive tasks 7 days after completing or canceling the task.